
Posted on July 15, 2013 by KylieMawdsley
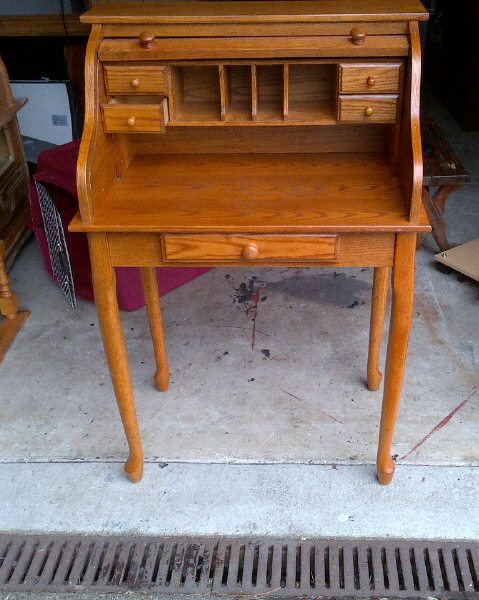
Painted Roll Top Desk – Before and After
I bet you have never thought of painting a roll-top desk. I bet you would think about the ‘function’ of a roll-top desk and would say to yourself ‘Now THAT is a bad idea – all of those moving parts, who would even try something like that?‘ Yours truly would, that’s who – I am my own hero!
And surprise surprise – it turned out AMAZING! (and yes, I even amazed myself – which is not hard to do).
AND, this little fella actually got featured on the HGTV site (I have officially arrived).
It was quite cutie-patootie before but boooooring.
After – And now we’re talkin’!

(more photos below the instructions)
How to Paint a Roll-Top Desk
First of all, if you want to paint a roll-top desk you have to accept the fact that you will not get a ‘factory finish’. Because of the nature of a ‘roll top desk’, it better suits a distressed look. This allows you to a) keep the track clear of paint without it looking out of place as the only unpainted thing and b) means you can have bare coverage in the seams of the roll-top which will allow for a smooth roll. These ‘barely covered’ seams will tie in nicely with the distressed edges on the rest of your desk. Capiche?
Step 1 Sand
I used 150 grit just to break up the sheen
Step 2 Wipe down
I used a tack cloth and a dry paintbrush to get rid of all of the sanding dust. Of course all of the dust settled quite nicely into the nooks and crannies of the roll-top so I used the tack cloth (which is what it says – a tacky cloth) to wipe the dust off of the body and then used the brush and my breath to blow/brush the dust out of the crannies.
Step 3 Painting
(For now, you will ignore the ‘roll-top’ part of the desk – says me)
I painted the body like I would paint any other piece of furniture You know, do my brush work on the corners and joints and then rolled on the flat surfaces. This piece took 3 coats of Behr Ultra in eggshell finish
*I did not get any paint in the actual track that the roll-top runs along. I’m sure you can see how this would’ve caused problems…

Step 4 Distressing
I distressed the edges to show some wear and tear and courtesy of one of my followers (sounds cultish, doesn’t it). Okay, let’s rephrase that, John, one of my blog subscribers was asking ‘how much distressing is too much distressing,’ and it made me think about the amount of distressing I do. So for this piece I decided to take it ‘slightly’ easier than I usually do ~ thanks John!
Step 5 The Tricky Part
Okay now here are the parts that are specific to the ‘roll-top’ part of the desk.
a) Before I used my paint brush I took my 4″ roller (10-13mm nap) and did a nice dry roll over the entire roll-top surface. Dry roll means that there is paint on the roller – but not very much. I didn’t want it going on thick enough that ANY went in to the cracks/seams of the roll-top. This dry roll gave me a very basic foundation to brush on to – meaning I had to do about 2 less brush coats.
b) Now I did want ‘some’ paint in those cracks (so that they didn’t look bare and out of place), so using a relatively dry brush (meaning that there was paint on it – but not very much) I did 3 coats of paint. This meant that I had to reload my brush with paint quite often (with a minimal amount), but it made it so that the paint couldn’t glom up in the cracks (trust me, there’s nothing worse than having glom in your crack). If the paint glommed up, it would make the rolls stick together…and that would be bad…
-
I let it dry ‘completely’ between coats. Again, this was so the paint didn’t glom up. Once it was dry between coats, I rolled it up and down several time to make sure things stayed loosey-goosey
-
I ran my brush horizonally along the roll-top – never vertically. This gave me enough coverage on the flat top surface and minimal coverage on the inside seams.
c) Once the painting was done, I used my hand sander to lightly – and I do mean lightly – hit some of the edges Just enough so that it looked worn and used – but not abused.
Step 6 Lube ‘er up!
I used a bit of clear wax on the rolling traack. If I were rolling the top often (or as often as Tim wishes I would – if you catch my drift) I’d probably have to reapply every once in a while to keep things rolling smoothly, but for now, this pretty little lady is just sitting sweetly in my home looking all cute and awesome!


So that’s it my friends…
Happy Decorating!

BTW, have you seen my Painted Pink Piano yet?
Kylie M Interiors Blog and More Interior Decorating and Design Colour Consulting and E-Design Based in Nanaimo BC, Canada
Share this!

Comments
Leave a Reply
More Posts

How to Turn Your House Into a Home: A Case Study
5 WAYS TO CREATE A HOMEY-HOME: A case study of OUR house! Between Pinterest, HGTV, Instagram, and design magazines, it’s easy to get caught up in what’s trendy and hipShare
Read More
KYLIE M’S 5 COLORS OF THE YEAR: 2024 Collection
REAL HOMES, REAL PEOPLE, REAL COLORS! When choosing my top colors for the year, I’m looking for colors that INSPIRE. Colors that talk to people (mind you, every color talksShare
Read More
Are White Walls, Cabinets & Exteriors Still Trendy for 2024?
Is the ALL-WHITE HOME still in style? Is white still in style as a paint color and interior finish? Are people still doing white cabinets, countertops, walls, and exteriors? AreShare
Read More


EPIC.
I am thinking of getting a roll top desk, but I was wondering how to get the look that I wanted…..
kudos to you for saying it CAN be done! So easy too.
just one TINY question… can you use the same method with chalk paint?
Hi Sara! You know, I don’t see why it COULDN’T be done with Chalk Paint, I’ve used a both a lot and I just don’t see it being a problem at all!