
Posted on January 14, 2020 by KylieMawdsley
Adding Personality to a Small Bathroom (Corner Shower)
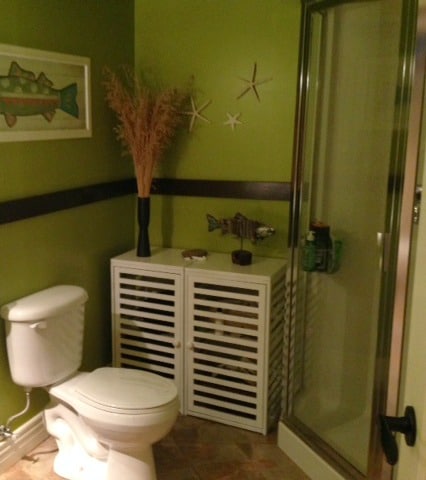
This bathroom was one tough customer. With its corner shower and pedestal sink, it was less than functional and super fugly – unless you’re a fan of fluorescent pea soup green. And while I could definitely improve on the vanity and paint colour, there wasn’t a lot I could do about the corner shower.

Holy Hannah, I kind of forgot how ugly it was…
In the ideal world (and because there was AMPLE room for it), the shower would have run across the back wall, approx 3′ deep by 6′ long. HOWEVER, because the toilet was installed too far over (1/2″ clearance with shower door), we couldn’t extend the shower without having to move the loo. And seeing how this was all installed on concrete, I wasn’t about to haul out my jackhammer and wallet.
Really, they could have chosen to not even PUT in a shower and made it into a lovely little powder room, which would have also given me more closet space in the hallway. This is one reason why I LOVE to look at clients floorplans, so I can suggest alterations before the walls go up – preventing mistakes like this from happening.
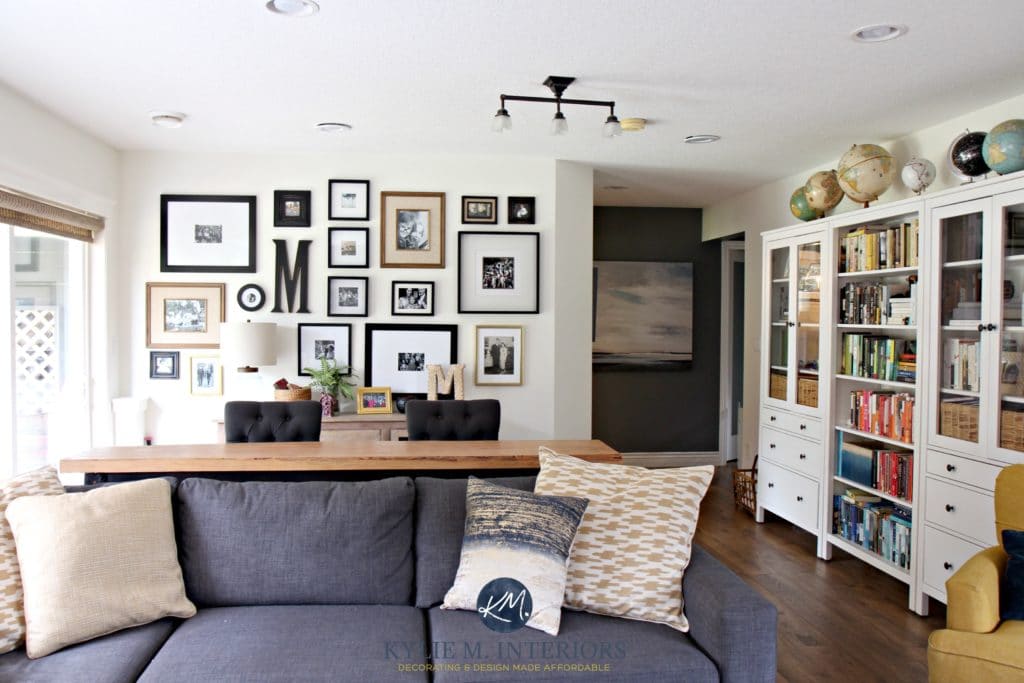
I wanted the colours in the bathroom to jibe with the family room as they were related to each other in the floorplan
Another important factor in NOT re-doing the shower was that this bathroom was built for the family room, meaning it didn’t have a bedroom that needed it. So while I HAD relegated Tim to this bathroom, MOST people wouldn’t ever even USE the shower in here.
Soooo, I decided to save $4000 and left the shower as-is and just added a little KLC to the rest of the space!
You ready Betty?

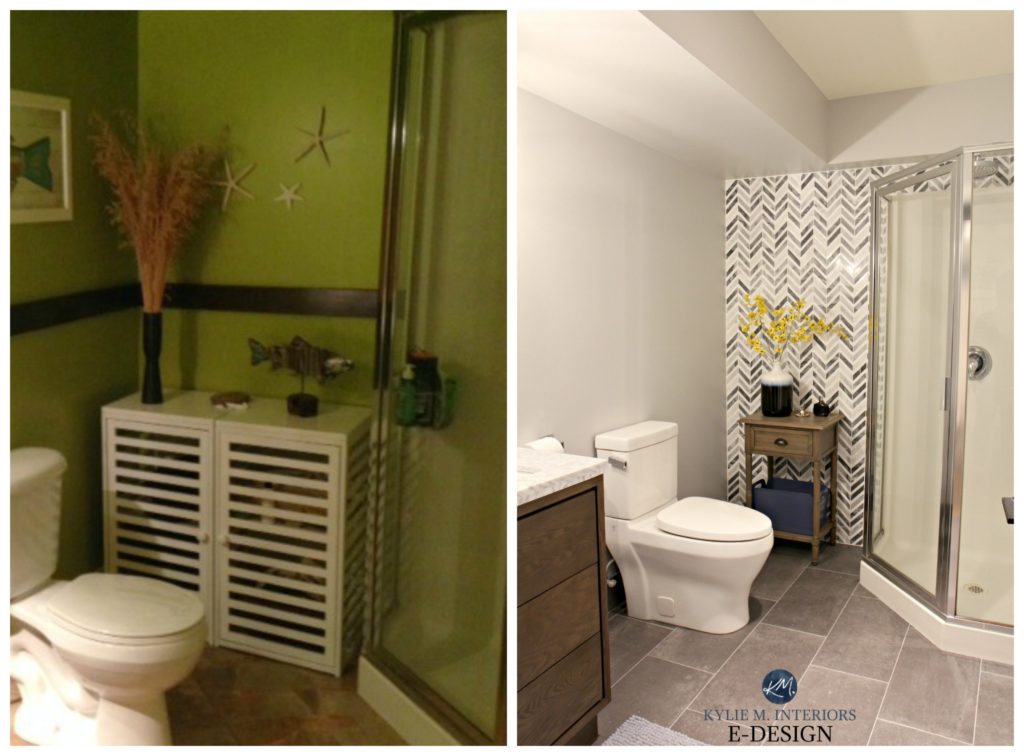
It’s hard to believe its even the same bathroom!
Let’s do a quick refresher of those green walls again…
And now…

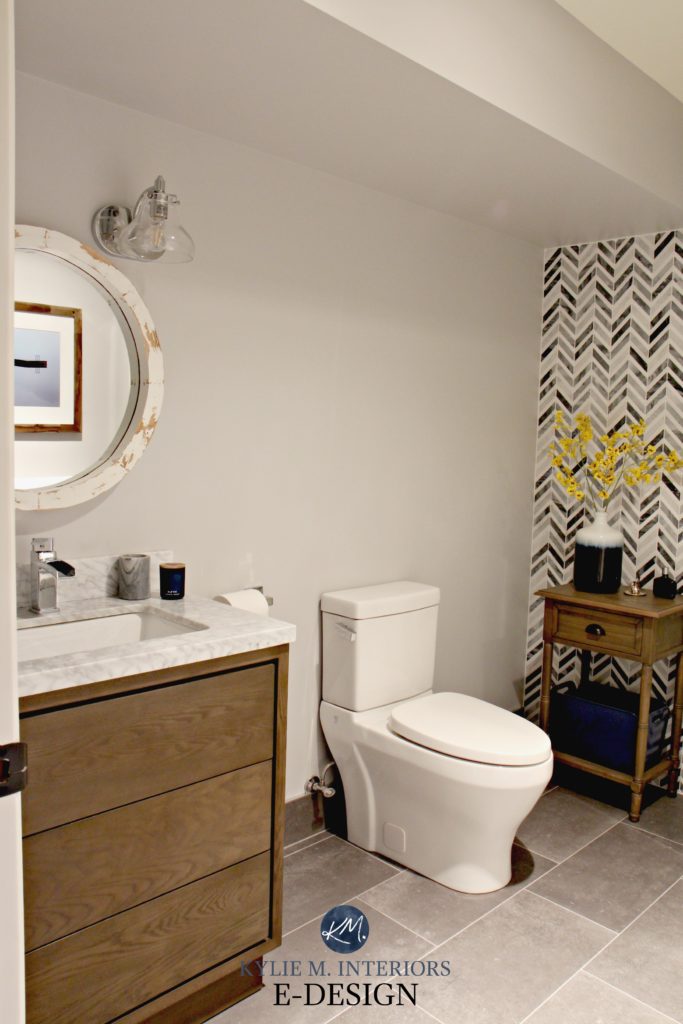
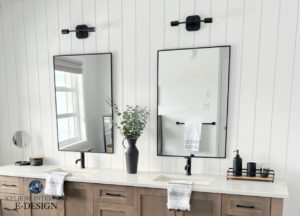
I wanted to add some personality to the room without killing my budget, so I decided to do a marble herringbone feature wall to add some SERIOUS visual value. Now when you walk in, its the pattern that grabs you, not the day-glo paint colour.
Read more: The Best Paint Colours to Coordinate with Marble Tile
And of course, the floor tile and feature wall were installed by Brett and his team of stud muffins from BE Tile. They also had to chisel up the old tile floor – poor buggers, but better them than me!

If it were me doing it, that big orange bucket would have been full of wine.

Read more: Bathroom Update Ideas: High-End Style for Low-End Prices
Lighter, brighter and DEFINITELY more clean and fresh looking.
Now, here’s a shot of the vanity area in the ‘in-between’ phase, where I slapped some paint on the walls just for the short-term. It definitely helped, but was kind of a ‘putting lipstick on a pig’ situation, ya know?

And now…

Much better! I got the vanity from Lowe’s for $399. I fell in love with the marble top, no fuss handle-free drawers and was excited to do a wood vanity, rather than white or gray. I’m not REALLY a gray gal, but it’s good for resale and the wood brought some warmth back to the room.
The paint colour I chose was Benjamin Moore Stonington Gray, one of my fave soft stormy grays. I had it lightened by 25%, just to freshen it up a stitch.

Read more: Colour Review Comparing Stonington Gray and Gray Owl
The light fixtures were a SUPER score from Canadian Tire at $49 apiece and with their rounded shade, were JUST what I was looking for. Because this room had no windows, the lighting situation wasn’t great. The old walls sconces with their lovely mint green shades cast a weird light on the walls and didn’t do anything for ma purdy lil’ face when I looked in the mirror.

And ABOUT that mirror! I couldn’t find what I wanted and it HAD to be round, courtesy of the awkwardly placed outlet (and yes, it needs to be updated to white, not janky yellow). I found this wood mirror at Home Sense for $39 and painted/distressed it to give it up some personality.
And just ONE more shot of that glorious green…
Project Cost
- Vanity – Lowes: $399
- Faucet – American Standard: $129
- Mirror – Home Sense: $39
- Light fixtures – Canadian Tire: $49
- Feature wall – Lowes: $275 (24 sq ft)
- Floor tile – City Tile: $250
- Paint – BM Stonington Gray: $45
- Tile installation – $1300
TOTAL COST: Approx $2500
So, what do you think, $2500 well spent? I think so!
Need help with your small bathroom?
Check out my affordable and FUN E-Design and Online Paint Colour packages!

Chat soon,

Read More:
Our Kitchen Remodel – No More Maple!
Our ‘Real’ Family Room – The Final Reveal!
ORIGINALLY WRITTEN 2017, AWESOMELY UPDATED IN 2020
Share this!

Comments
Leave a Reply
More Posts

How to Turn Your House Into a Home: A Case Study
5 WAYS TO CREATE A HOMEY-HOME: A case study of OUR house! Between Pinterest, HGTV, Instagram, and design magazines, it’s easy to get caught up in what’s trendy and hipShare
Read More
KYLIE M’S 5 COLORS OF THE YEAR: 2024 Collection
REAL HOMES, REAL PEOPLE, REAL COLORS! When choosing my top colors for the year, I’m looking for colors that INSPIRE. Colors that talk to people (mind you, every color talksShare
Read More
Are White Walls, Cabinets & Exteriors Still Trendy for 2024?
Is the ALL-WHITE HOME still in style? Is white still in style as a paint color and interior finish? Are people still doing white cabinets, countertops, walls, and exteriors? AreShare
Read More

The room looks fantastic! By the way, what is the brand and cost of the toilet? Why did you pick that particular one?
Author
Ugh, that toilet. I think it’s American Standard, but truthfully because of the concealed base it was a bugger to install and had to be re-tightened as the bolts loosened up…and the seat is uncomfortable…
Author
And BTW, I picked it because with the placement of the toilet (more or less full view of it from the bathroom door) I didn’t want to see the guts n’ the glory of it – I do like the more sleek profile (if you can call a toilet sleek 😉
Amazing! Looks about 3x bigger! I would have had a hard time parting with a pedestal sink though….
He Kylie,
What a difference. The bathroom looks amazing!
I’m in the middle of a powder room face lift. I’ve painted the cabinet cloud white, got a new counter top( quartz- colour raven). I painted benjamin Moore gray sky but it’s a bit bright.. My family room is nimbus gray, kitchen is horizon and the rest of the main floor is muslin. Any thoughts on a pale blue that might work? Or do you think horizon would be ok?
Thanks,
Sarah
Looks awesome! You’re right, like it’s not even the same room!
I just finished a transformation on our powder room, and it’s amazing that despite going from plain white walls to charcoal grey wallpaper and replacing a pedesatal sink with a 30″ vanity, it still seems way bigger than before! How is that even possible?
Author
It’s so weird, isn’t it? It’s like you’re giving the room what it wanted in the first place – so it’s finally happy!
What a great job! I had to scroll back and forth from the green bathroom to the new one just to compare. It looks like a totally different bathroom. You’re so talented.
Author
Well thank you Bert!
I can’t even believe it’s the same bathroom! I love everything about it!
Author
Thank you Deedra! It looks like I have an email in my inbox from you too, which I’ll be checking shortly!
Thanks for another inspiring post. Love the feature wall and the wood vanity. They give the room a comfortable and warm yet dramatic feel. I guess you could say, “Even though it’s wood, it looks really good!” LOL
I’m a huge fan and love your blog!
This is fabulous as always, Kylie. Ditto on Bert’s comment! I really enjoy seeing your transformations, and your tips are so helpful.
Wow, you’re super talented Kylie – the bathroom looks great – and I love love the wallpaper you chose. I’m not bold enough to try things like that, but seeing the result of yours gives me pause to possibly try it in my (very tiny, 1939 circa, pale pink tiled) bathroom. Thanks for the inspiration!
Hi Kylie,
Love that bathroom transformation!
What is that vanity called? I checked Lowes and Home depot but they don’t seem to have it online. I am remodelling my bathroom soon and these ideas are great! Would love that vanity in my bathroom!
Thanks in advance!
Author
Hi Nilofer, I couldn’t find it either! Maybe they’ve stopped carrying it? I do know they switch things up sometimes…mind you when I look at their online site, I don’t see a LOT of the vanities that I’ve seen in the store!
Thank you, Kylie. Heading to the store tomorrow!
That tiled wall makes it ahh-mazing!! What a great idea to detract from the corner shower.
Author
Thank you Alysa!
Amazing job, I kept scrolling back and forth as well.
Just one thing, do you think some cool art over the toilet area would look nice?